Five months of updates condensed into one entry. Are you ready?? Go!!
The Foundation

Building this house, brick by brick
It was the dreaded word thrown about for months on end. Foundation, foundation, foundation. And after months of tireless work in the muck and mud that is the pit along the basement door... it's still not done haha. It's close though!
I paused on all of my own summer projects come September and joined Tony at Foundation Central in the back of the house. Alastair, our resident Englishman and descendant of the builders of Stonehenge (presumably), taught Tony the basics of brick laying so we could begin rebuilding the foundation walls. Alastair took one corner while Tony took the other, and they began the brick laying process. As we soon realized, it's a slow one. You have mere seconds to 'butter your brick' before placing it down, else you risk the mortar drying out too quickly, yet this tight time frame doesn't speed things along for a bunch of newbies such as us.
With Alastair and Tony's walls nearing completion, Tony and I teamed up to tackle the long foundation wall along the bathroom. Over the course of 3 days we had the wall 95% complete... a snaking, uneven, S-shaped pile of bricks. We learned a little too late that following the stone foundation below didn't necessarily guarantee a straight or level line. The wall was so uneven you could fit a whole brick along the top row in one corner, and a 1/2 inch piece of plywood in another. The wall is currently being held by a few choice bricks and other well-supported corners (we learned our lesson) so once spring comes around we intend to re-do the wall. Sad as it will be to knock our own work down, it's certainly necessary. These walls happen to be in a corner of the basement that is basically hidden from view, so we plan on running an interior wall of cinder blocks for added support and an outer wall of brick.
Now that we're well informed in the basics of wall building, we should be able to complete the remaining foundation work in a matter of weekends. A nice hefty, level layer of concrete should speed things along and give us that level brick line we slightly missed the first time around.
PAINTING!!!!!

Now coming to a farmhouse near you... Pinedale Shores!
No no, Pinedale Shores is not Vermont's newest retirement complex. It is... (drumroll) our house color! A hundred exclamation points cannot express my excitement about this topic. Endless hours of sanding this summer resulted in an entirely sanded front of the farmhouse (minus the peak which was a little too high for my fair heart). After sampling a multitude of greens, blues and grays, we settled on Pinedale Shores by Behr. It had everything we were looking for: a gray-blue appearance that felt warm, antique-y and clean. It was love at first brush stroke.
Even though only a portion of the front of the house has been painted, we've had countless people stopping by to say they love it or to flat-out thank us for making that yellow-green combo disappear. It turns out a lot of residents and visitors have always loved this house and are happy people have taken on the behemoth task of saving it. We're happy to oblige :)
Our dear friend Katie came up for a visit at the end of August and helped me get the ball rolling with the painting cause. We were making significant progress until I had to pause paint work to help Tony with the foundation in the back. The yellow lady now sits with a neater looking blue-gray front, but just this small portion of the house being done hints at how magnificent it will look when the whole house has been completed. Our initials thoughts were correct... this is a beautiful home and will be stunning once again.

The arrival of summer 2012 will bring a hold to all interior work as we take on painting the exterior house with all hands on deck. We realized after beginning that all of the clapboard needs to be primed after sanding, which will slow us down a wee bit, but this house WILL be painted by next summer. Scaffolding may have to make an appearance to reach the peaks unless we become really brave (or really foolish) by next summer. Let's make the old gal lovely again!
Exterior Repairs
A true DIY'er knows when it's time to call in the professionals. Such was the case with us in late October when the cavalry came in to save us from two MASSIVE exterior repairs. Their names: Guy and Billy. These two talented, hard-working, perfection-seeking contractors did a series of jobs for my parents' home over the past two years and have done an incredible job every time. They braved snow showers, no bathroom and falling temperatures to demo and rebuild the rotted, leaking roof over the downstairs bathroom AND close in the basement by building an amazing stronghold of cinder block walls on which we'll place the hatch door for the basement. The before and after of these projects are just amazing. In the bathroom, clean beams now cross the ceiling where previously support beams had been so rotten they had fallen off the wall. The roof itself was a mess that words cannot describe. A picture ought to do the trick.

The roof before repairs, if you couldn't tell
A week after leaving Guy and Billy to fend for themselves, we returned to find pure construction magic. The new roof has a proper pitch which should allow for snow runoff so rotting of the siding in this area should cease. It's metal, it's clean and it's leak-poof. It's everything we love!


The new bathroom roof is snug as a bug
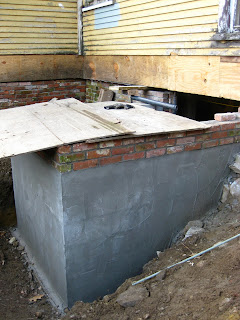 Our new basement door walls... built like a fort!

The walls built to seal in the basement door speak for themselves. Guy, a specialist in masonry work, managed to interlock the cinder block walls with the uneven and oddly spaced stone foundation walls of the house. Its seamlessness was astounding! At least we know large woodland animals won't be able to hibernate in our home this winter. Step by step this house is becoming sealed from the elements! We only have about 100 more holes to go.
Interior Repairs

Tony and our new dog Bailey work together to remove the kitchen floor
We've reached the final frontier of this update! Interior work. This might be the briefest of all updates since working inside the house has been our last priority for the last few months. First and foremost, I am sad to admit that our slow progress with finishing the foundation meant... plumbing could not go in before winter hit. Therefore, despite all of my proclamations in the spring, heating did not go in before another Vermont winter settled in. We are cold once again! This thought initially made me want to cry but I have since accepted it and have mentally moved on. It's time to bring out the layers. Work must go on!
The entire first floor was demo'd by September. Yours truly spent a few days alone at the house in August and finished the last bit of demo in the future library. What I uncovered no man, woman or child should have to face alone. Tearing down the ceiling revealed a mouse nest colony that ran half the width of the room and was 4 beams across in length. In total, I was forced to pull down, sweep up and throw out a mouse nest roughly 30 sq. ft. in size. My horror knew no bounds. The tapestry of profanities I wove that day is still hanging over the first floor.

Mouse nest, anyone?
Before Tony and I move our sights upstairs to second floor demo, we have a list of first floor fixes that remain. First on this list is laying down the kitchen subfloor. Giant holes going directly down into the basement seem to imply that there isn't one. We took on this hefty task the day after Christmas, when Tony and I headed up to the house with our new dog Bailey, an incredible young man adopted from the SPCA that won our hearts within 2 seconds. With Bailey's excellent supervisor skills we managed to take up the boards for over 1/3 of the room, which is a pretty good ratio considering the entire area near the back of the room has a subfloor and doesn't need to be removed. The last 5 feet of floor still must be removed, which will take a bit of time since we need to saw through every set of nails holding down each board, but it can be done! Once everything is lifted we'll make sure our subfloor is even and nail down the boards. Then, it's time to sort through our massive piles of leftover wood and see what can be used to patch in the formerly vacant spots in the flooring. Completing the task will be like working on a giant-sized puzzle. I love a good challenge!

Watch your step now...

Bailey and I pose for a family portrait
In conclusion, the blog is back!!! We'll be heading back to the house in two weeks to continue work on the kitchen floor, and I promise to post about it soon thereafter. Even if grad school keeps me busy, letting 5 months go in between posts just won't fly. Updates will be more regular from this moment on, you have my word!
Slideshows from the last few months:
Thanks again for reading and sharing in this story of ours. More to come soon. Happy New Year, all!
- Melissa
It is good that you thought ahead and snow-proofed your house. Structures in areas where snow and blizzards usually occur should have roofs with higher pitch to let the snow slide and prevent the water from collecting. Homes in warmer regions don’t need a steep pitch roof, but houses in temperate climates will vary in design, depending on how close they are positioned in warmer or cooler climates.
ReplyDeleteIt’s safest to have a high-pitched roof. This would help you save on your utility bill as well. Why? Because it has enough of an overhang, it creates greenhouse effect that makes your home cooler, especially during summer. It is also cheaper to build. Is the renovation complete? Would love to see updates on your incredible house! ^___^
ReplyDeleteKristopher Diss
Hi Kristopher,
DeleteThanks for writing! Our most recent blog post was this past February. Click the title of the blog on the top of the page to take you to the main page! We’ve taken a break from work this winter unfortunately, since it’s just too cold to get much done inside without any heat. We’ll be heading up in two weeks though to brush out the cobwebs and get back to work. We’ll be posting again soon!